
이 간단한 Phaser 튜토리얼은 심플한 2D 플랫폼을 만드는 방법을 보여줍니다.
이 튜토리얼에서는 이미 Phaser에 익숙하다고 가정합니다. 만약에 익숙하지 않으면 먼저 Phaser Js 로 Flappy Bird 만들기 - 1 과 Phaser Js 로 Flappy Bird 만들기 - 2 를 확인해 하시면 됩니다.
기본적으로 빈 페이저 프로젝트 인 게임의 구조를 만들어 보겠습니다.
// 전체 게임을 포함 할 상태 만들기
var mainState = {
    preload: function() {
        // 여기에 자산을 미리로드합니다.
    },

    create: function() {
        // 여기에 게임을 만듭니다.
    },

    update: function() {
        // 게임을 초당 60 회 업데이트합니다.
    },
};

// 게임 초기화 및 상태 시작
var game = new Phaser.Game(500, 200);
game.state.add('main', mainState);
game.state.start('main');
create () 함수름 다음과 같이 변경하여 게임 설정을 합니다.
    create: function() {
        // 배경색을 파란색으로 설정하십시오.
        game.stage.backgroundColor = '#3598db';
        // 아케이드 물리 시스템을 시작하십시오 (이동 및 충돌 용).
        game.physics.startSystem(Phaser.Physics.ARCADE);
        // 모든 게임 개체에 물리 엔진 추가
        game.world.enableBody = true;
    },
그리고 preload () 함수에서 다음과 같이 사용하는 스프라이트를 로드합니다.
    preload: function() {
        // 여기에 자산을 미리로드합니다.
        game.load.image('player', 'assets/player.png');
        game.load.image('wall', 'assets/wall.png');
        game.load.image('coin', 'assets/coin.png');
        game.load.image('enemy', 'assets/enemy.png');
    },
화살표 키로 제어 할 수있는 플레이어를 추가해 봅시다.
그래서 다음 코드를 create () 함수에 추가하십시오.
        // 화살표 키를 저장하는 변수
        this.cursor = game.input.keyboard.createCursorKeys();
        // 플레이어 만들기
        this.player = game.add.sprite(70, 100, 'player');
        // 중력을 가하여 떨어 뜨립니다.
        this.player.body.gravity.y = 600;
그리고 다음 코드를 update () 함수에 추가합니다.
        // 화살표 키를 누르면 플레이어가 움직입니다.
        if (this.cursor.left.isDown)
            this.player.body.velocity.x = -200;
        else if (this.cursor.right.isDown)
            this.player.body.velocity.x = 200;
        else
            this.player.body.velocity.x = 0;

        // 플레이어가 땅에 닿으면 점프하게하십시오.
        if (this.cursor.up.isDown && this.player.body.touching.down)
            this.player.body.velocity.y = -250;
다음 단계는 플레이어에게 레벨을 부여하는 것입니다. create () 함수에서 다음과 같이 설정합니다.
// 객체를 포함 할 3 개의 그룹을 만듭니다.
this.walls = game.add.group();
this.coins = game.add.group();
this.enemies = game.add.group();
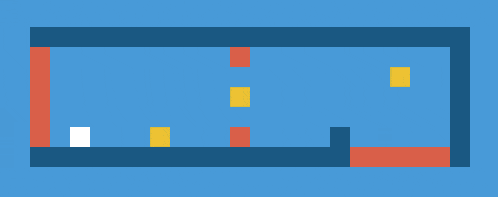
// 레벨을 디자인하십시오. x = 벽, o = 동전,! = 용암.
var level = [
'xxxxxxxxxxxxxxxxxxxxxx',
'! ! x',
'! o x',
'! o x',
'! x',
'! o ! x x',
'xxxxxxxxxxxxxxxx!!!!!x',
];
// 배열을 통해 레벨 만들기
for (var i = 0; i < level.length; i++) {
for (var j = 0; j < level[i].length; j++) {
// 벽을 만들어 '벽'그룹에 추가하십시오.
if (level[i][j] == 'x') {
var wall = game.add.sprite(30+20*j, 30+20*i, 'wall');
this.walls.add(wall);
wall.body.immovable = true;
                }

                // 동전을 만들어 '동전'그룹에 추가하십시오.
                else if (level[i][j] == 'o') {
                    var coin = game.add.sprite(30+20*j, 30+20*i, 'coin');
                    this.coins.add(coin);
                }

                // 적을 만들어 '적'그룹에 추가하십시오.
                else if (level[i][j] == '!') {
                        var enemy = game.add.sprite(30+20*j, 30+20*i, 'enemy');
                        this.enemies.add(enemy);
                }
            }
        }
마지막으로 update () 함수에서 이와 같은 플랫폼 작성자의 모든 충돌을 처리해야합니다.
        // 플레이어와 벽을 충돌 시키십시오.
        game.physics.arcade.collide(this.player, this.walls);

        // Call the 'takeCoin' function when the player takes a coin
        game.physics.arcade.overlap(this.player, this.coins, this.takeCoin, null, this);

        // Call the 'restart' function when the player touches the enemy
        game.physics.arcade.overlap(this.player, this.enemies, this.restart, null, this);
그리고이 두 가지 새로운 기능을 추가해야합니다.
    // 동전 제거 함수
    takeCoin: function(player, coin) {
        coin.kill();
    },

    // 게임 재시작 함수
    restart: function() {
        game.state.start('main');
    }
여기에 우리가 함께 만든 작은 2D 플랫폼이 있습니다.
'PROGRAMMING > Phaser Js' 카테고리의 다른 글
| Phaser Js 에서 이미지를 추가하는 방법 (0) | 2018.01.26 |
|---|---|
| Phaser Js 기본 타이머 사용 설명서 (0) | 2018.01.26 |
| Phaser js 로 HTML5에서 브레이크 아웃 클론을 만드는 방법 (0) | 2018.01.26 |
| Phaser Js 로 Flappy Bird 만들기 - 2 (0) | 2018.01.26 |
| Phaser Js 로 Flappy Bird 만들기 - 1 (0) | 2018.01.26 |